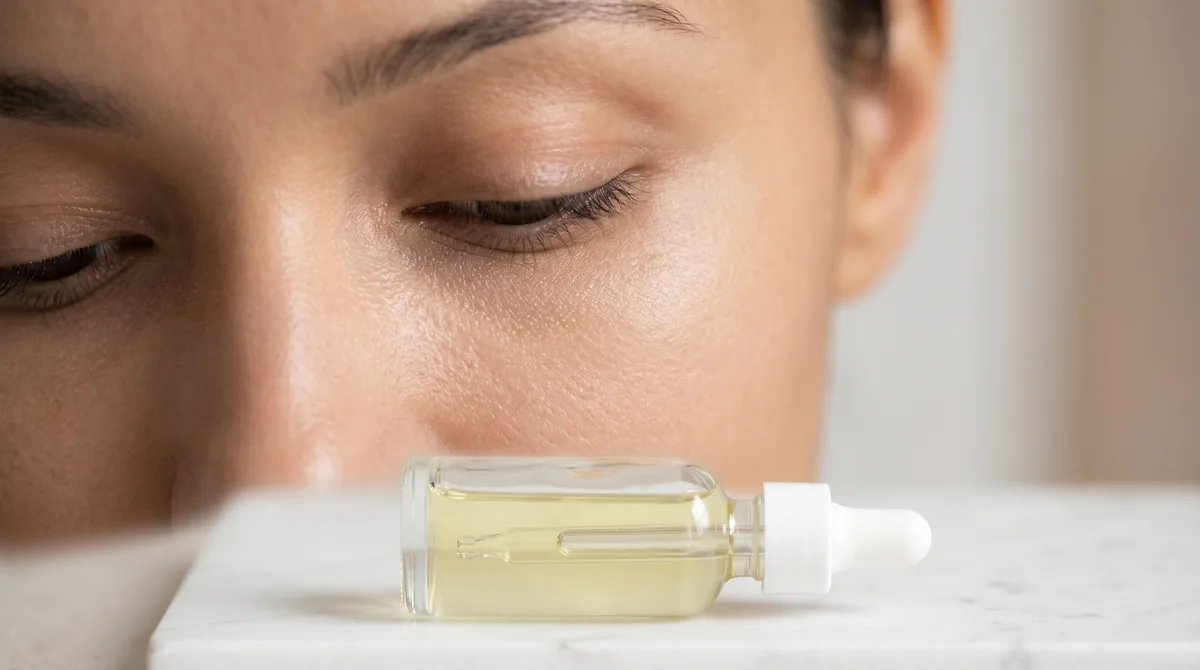
You bought the retinol. You know it works for fine lines. But the second you tried it near your eyes, your skin staged a full revolt. Burning, flaking, redness that made you look like you’d been crying for three days straight. So you stopped, and now the tube sits in your drawer while the crow’s feet deepen.
Here’s what happened: the skin around your eyes is different. It’s thinner, more permeable, and has fewer oil glands than the rest of your face. That means retinol penetrates faster and irritates easier. Add in the Gulf’s dry air and hard water (which compromises your skin barrier before you even start), and you’ve got a setup for failure unless you adjust your approach. This article contains affiliate links. See our affiliate disclosure for details.
The good news? Retinol absolutely can work around the eyes without turning you into a flaky, red mess. But it requires a different protocol than what you’d use on your forehead or cheeks. Lower strength, slower introduction, and a few non-negotiable buffer strategies. This is the guide for doing it right in a climate that’s already working against your skin barrier.
Key Takeaways
• The skin around your eyes is 40% thinner than facial skin and has fewer sebaceous glands, making it more prone to retinol irritation
• Start with 0.01-0.025% retinol for the eye area, even if you use 0.1% elsewhere on your face. The orbital skin requires lower concentrations
• Apply only on the orbital bone (where you can feel bone beneath skin), staying 1cm away from the lash line and avoiding the mobile eyelid entirely
• Buffer retinol with a rich eye cream before and after application to slow penetration and reduce irritation without losing efficacy
• In dry climates, expect a longer adjustment period (6-8 weeks vs. 4 weeks) due to compromised barrier function from environmental factors
Why Eye Skin Reacts Differently to Retinol
The periorbital skin (the area surrounding your eye socket) is structurally different from the rest of your face. It’s roughly 0.5mm thick compared to 1.5-2mm on your cheeks. That’s not just thinner. It’s more permeable.
Research published in the Journal of Cosmetic Dermatology found that transepidermal water loss around the eyes is 2-3 times higher than on other facial areas, meaning the barrier is naturally weaker. When you apply retinol to a weaker barrier, penetration happens faster and deeper. That’s why the same 0.1% retinol that your cheeks tolerate fine can torch the skin under your eyes.
Add in fewer sebaceous glands (the oil-producing glands that help cushion irritation), and you’ve got skin that’s both more reactive and less equipped to handle the side effects. The eye area also moves constantly. Every blink, squint, and smile stresses the skin, which means any irritation gets amplified by mechanical friction.
In the Gulf, this problem gets worse. Desalinated water and low humidity already compromise your skin barrier, so you’re starting from a deficit. Your eye area’s natural weakness plus environmental assault means you can’t use the same retinol strength or frequency you’d use in a temperate climate.
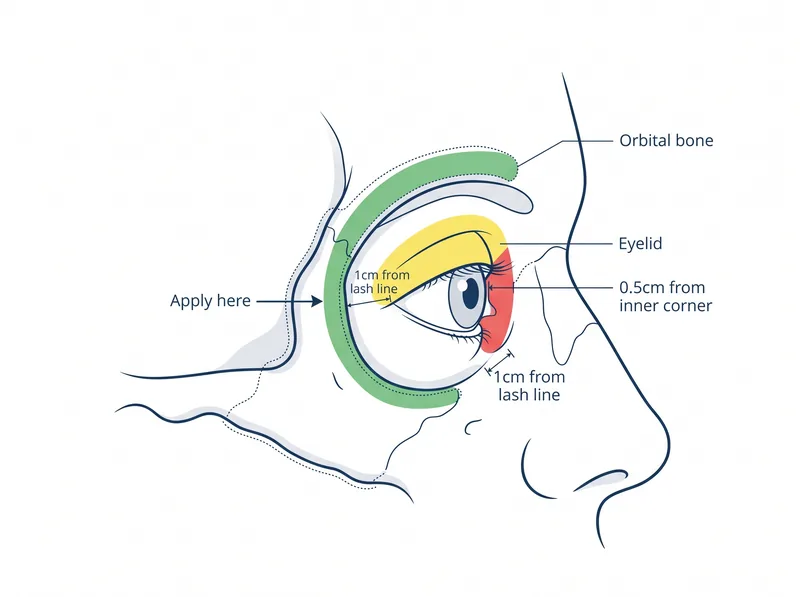 The orbital bone rule: Apply retinol only where you can feel bone beneath the skin, staying clear of the mobile lid and inner corners.
The Right Retinol Strength and Formulation
If you’re new to retinol around the eyes, start with 0.01% or 0.025% retinol. Not retinyl palmitate or retinyl acetate (the weak ester forms that don’t do much). Actual retinol, just at a beginner strength.
Even if you’re already using 0.1% retinol on the rest of your face without issue, drop down for the eye area. The Cleveland Clinic’s dermatology guidelines recommend starting at the lowest effective concentration for sensitive areas, and the eyes qualify as the most sensitive zone on your face.
Formulation matters as much as strength. Look for retinol suspended in an emollient base (creams, not serums). The richer the vehicle, the slower the penetration. A retinol eye cream will irritate less than a lightweight retinol serum, even at the same percentage, because the oils and occlusives slow down how fast the active gets into your skin.
Avoid retinol formulations with additional actives like AHAs, BHAs, or high percentages of niacinamide in the same product. Your eye area doesn’t need a cocktail. It needs one thing done gently. If you want to use other actives around your eyes, apply them at different times of day or on alternating nights.
The Orbital Bone Application Rule
Here’s the safest application zone: anywhere you can feel bone directly beneath the skin when you press gently with your finger. That’s your orbital bone, the bony ridge that frames your eye socket.
Start at the outer corner of your eye, just below where crow’s feet form. Press lightly. You’ll feel bone. That’s safe. Move along the lower orbital ridge toward your nose, staying on the bone. Stop about 1cm before you reach the inner corner (the area near your tear duct). That inner corner is too thin and too close to the eye itself.
On the upper eye area, you can apply retinol along the brow bone, but stay completely off the mobile eyelid (the part that moves when you blink). The mobile lid has almost no barrier protection and will react badly. If you’re not sure where the line is, close your eyes and feel where the skin folds. Anything that folds when you blink is off-limits.
A common mistake: applying retinol too close to the lash line. Even if you’re careful, retinol migrates. It’ll travel toward your eye as you sleep or as the product warms on your skin. Always leave at least 1cm of buffer space between your application zone and your lashes. The retinol will migrate inward on its own. You don’t need to help it.
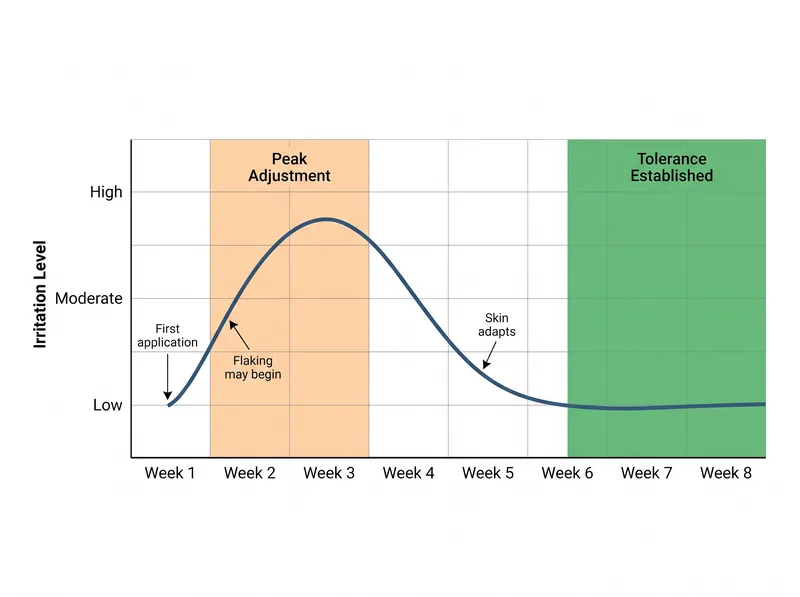 What to expect: Most irritation peaks in weeks 2-3, then subsides as skin adjusts. Persistent burning beyond week 6 means you need to scale back.
Buffering Strategies That Actually Work
Buffering means applying a protective layer before or after your retinol to slow penetration and reduce irritation. It doesn’t make retinol ineffective. It just makes it gentler, which is exactly what you need for the eye area.
The sandwich method works best: apply a thin layer of rich eye cream, wait 5 minutes, apply your retinol, wait another 5 minutes, then apply a second layer of eye cream on top. This creates a controlled-release effect. The retinol still gets into your skin, but it does so gradually instead of all at once.
Choose a buffering cream with ceramides, cholesterol, or fatty acids. These lipids help reinforce the barrier while the retinol works. Avoid buffering with products that contain actives (vitamin C, peptides, acids). The buffer should be inert and protective, not stimulating.
In dry climates, you can also add a final occlusive layer (a tiny amount of petroleum jelly or squalane oil) over the second eye cream layer. This locks everything in and prevents transepidermal water loss overnight, which is critical when indoor AC and low humidity are constantly pulling moisture out of your skin.
Introduction Schedule for Sensitive Eye Skin
Don’t start with nightly application. Your eye skin needs a slow ramp-up, especially in a harsh climate. Begin with once a week for two weeks. Just once. Pick a night, apply your buffered retinol, and then leave it alone for six days.
If you tolerate that without significant irritation (mild dryness is normal, burning or peeling is not), move to twice a week for the next two weeks. Then three times a week for two weeks. You’re looking at a 6-8 week adjustment period before you attempt nightly use, and even then, nightly might not be necessary.
Many dermatologists recommend stopping at 3-4 nights per week for the eye area long-term, even after your skin adjusts. The goal isn’t maximum frequency. It’s consistent, tolerable use that you can maintain for years. Three nights a week done consistently will give you better results than seven nights a week that you have to stop after a month because your skin is wrecked.
If at any point you experience burning that lasts more than 10 minutes after application, or if you wake up with red, inflamed skin, you’ve pushed too hard. Drop back to the previous frequency and stay there for another two weeks before trying to increase again.
What to Expect During the Adjustment Period
Week one: probably nothing. Your skin might feel slightly dry the next morning, but dramatic reactions are rare on the first application, especially if you’re buffering properly.
Weeks two through four: this is when irritation typically peaks. You might see flaking along the orbital bone, mild redness, or a tight, dry feeling. Some people describe it as the skin feeling ‘papery.’ This is the retinization process, your skin is increasing cell turnover and hasn’t yet adapted to the new pace.
The flaking isn’t dead skin in the traditional sense. It’s your skin shedding faster than usual because retinol accelerates the cell renewal cycle. Don’t pick at it or scrub it off. Gently pat on more moisturizer and let it resolve on its own. Aggressive exfoliation will make the irritation worse.
By week six, if you’ve followed a gradual introduction schedule, the irritation should be subsiding. Your skin starts producing more natural moisturizing factors and thickening the dermis (the deeper layer where collagen lives). This is when you start seeing the benefits: smoother texture, fewer fine lines, better skin tone. If you’re still experiencing significant irritation at week six, your strength is too high or your frequency is too aggressive. Scale back.
Climate-Specific Adjustments for Dry Environments
If you’re in the Gulf, Arizona, or any low-humidity environment, your retinol protocol needs extra support. The air is constantly pulling moisture out of your skin, which means your barrier is under attack even without retinol in the picture.
First adjustment: increase your buffer layers. Instead of a thin layer of eye cream before and after retinol, use a thicker application. You need more occlusion to counteract the environmental water loss. If your usual eye cream feels too light, switch to something richer for the nights you use retinol.
Second adjustment: consider using a humidifier in your bedroom. Indoor humidity below 30% significantly impairs barrier recovery, and most Gulf homes with AC run at 20-25% humidity. A small humidifier near your bed can make a measurable difference in how your skin tolerates retinol.
Third adjustment: be more conservative with your introduction schedule. If the standard protocol is once a week for two weeks, you might need once a week for three weeks. Your skin is dealing with more environmental stress, so it needs more recovery time between retinol applications. There’s no prize for speeding through the adjustment period. Slow and steady wins here.
When to Stop and Reassess
Not all irritation is normal adjustment. Some reactions mean you need to stop completely and rethink your approach. Persistent burning that lasts more than 15 minutes after application isn’t a sign of ‘working.’ It’s a sign of damage.
If your eyes themselves become irritated (red, watery, stinging), the retinol is migrating too close. Stop immediately, flush your eyes with clean water, and when you restart, apply the retinol farther from the lash line and use a heavier buffer. Eye irritation can lead to chronic inflammation of the conjunctiva, which isn’t worth it for cosmetic benefits.
Swelling or puffiness that persists into the next day is also a red flag. Mild morning puffiness is common (the eye area retains fluid when you’re lying down), but if you’re still puffy by midday, or if the puffiness is accompanied by heat or tenderness, you’re having an inflammatory reaction. Stop the retinol and let your skin fully recover before attempting a lower strength.
If you’ve tried the lowest available strength (0.01%), used aggressive buffering, applied only once a week, and you’re still experiencing intolerable irritation, retinol around the eyes might not be for you. And that’s okay. There are other options for eye wrinkles (peptides, bakuchiol, growth factors) that don’t carry the same irritation risk. Retinol isn’t the only answer.
Supporting Your Barrier During Retinol Use
Your morning routine matters as much as your nighttime retinol application. The day after using retinol, your skin needs extra barrier support and sun protection (retinol increases photosensitivity, meaning your skin burns more easily).
In the morning, skip any harsh cleansers. Use a gentle, hydrating cleanser or even just rinse with water if your skin feels tight. Pat dry gently. Then apply a hydrating serum (hyaluronic acid or glycerin-based) while your skin is still damp, followed by your regular eye cream and a broad-spectrum SPF 30+ sunscreen.
The sunscreen part is non-negotiable. Retinol makes your skin more vulnerable to UV damage, and the eye area is already a high-UV zone (people forget to apply sunscreen thoroughly around the eyes). If you’re using retinol at night and not wearing sunscreen during the day, you’re undoing any benefits and potentially making sun damage worse.
Throughout the day, if your eye area feels dry or tight, you can apply a thin layer of your eye cream over your makeup or sunscreen. It won’t look greasy if you use a small amount and pat it in gently. Keeping the area hydrated between retinol applications helps the barrier recover faster and reduces cumulative irritation.
References
- Skin barrier function and transepidermal water loss in the periorbital region - PubMed - Journal of Cosmetic Dermatology
- Retinol: Uses, Side Effects, Interactions, Dosage, and Warning - Cleveland Clinic
- How to Use Retinoids and Avoid Side Effects - American Academy of Dermatology
- Humidifiers: Ease skin, breathing symptoms - Mayo Clinic